

I do my best to take care of my brushes, but I occasionally I forget to wash one out. Every artist eventually makes this mistake. When it happens to you, don’t throw the brush away because there’s an easy way to restore it. Acrylic paint is considered to be permanent when dry, however there’s a non toxic and odorless brush cleaner you can use to remove dry paint from your brushes.
How to Remove Dry Acrylic Paint From Brushes without solvents? The absolute best way that I’ve found to remove dry acrylic paint from my brushes is to use EZ air brush cleaner. It’s non toxic, odorless, and biodegradable. Soak the brush overnight in equal parts brush cleaner and warm water. Use a rag and a toothbrush to pick off the dry bits of acrylic paint. Rinse with soap and water and repeat if necessary.
Many artists use solvents to clean dry acrylic paint from their brushes, but I don’t recommend it. At the end of the post, I explain why I don’t think it’s a good idea to use these solvents. I think that once you try this brush cleaner, you probably won’t go back to using solvents.
How to Use EZ Air Brush Cleaner to Remove Dry Acrylic Paint
Below is an illustrated guide on how to use brush cleaner to remove dry acrylic paint from a paint brush with nylon bristles. It also works on natural bristles too. This is based upon the instructions from the manufacturer that are on the bottle, along with some of my own tips. I found this brush cleaner in the 1990’s and I still use it today for cleaning my brushes. I’m incredibly impressed with the results.
I purposely ruined an old paintbrush for this demonstration. I dipped the bristles in some Cerulean Blue acrylic paint and let it dry for over a week. This ensures that the paint is really cured which will make it more challenging to remove.
Required Materials
- Safety Glasses: the main ingredient in the brush cleaner is sodium carbonate, which is found in laundry detergent. The label states that it’s a mild eye irritant so please wear eye protection when working with it.
- Disposable Gloves: (not in the photo above) I use disposable vinyl gloves to keep the paint off of my hands. After you soak the brush in the cleaner, the paint becomes rubbery and it dissolves a little. The gloves will help to protect your hands. Here are disposable gloves on Amazon.
- EZ Air Acrylic Brush Cleaner: you can buy this brush cleaner on Amazon, but it’s also available at some craft stores.
- A Container to Soak the Brush In: I’m using a narrow glass flower vase because it will require less cleaner solution to soak the bristles. If you’re cleaning more than one brush, you can use a larger container
- Rag: a rag works for wiping the the soft acrylic paint off the bristles. I use old undershirts and towels as rags. But I also like these microfiber clothes from Amazon.
- Discarded toothbrush: a toothbrush is useful for scrubbing bits of paint off from between the bristles.
- Binder Clip or Clothespin: This is optional, but I use the clip to prevent the brush from resting on the bristles overnight in the container.
1 Pour Some EZ Air Acrylic Brush Cleaner Into a Container

I like to use glass containers because they’re heavy. Lightweight plastic containers often tip over when you put brushes in them. Here I’m using a flower vase because it’s narrow and I only need to clean one brush. I won’t need to use as much cleaner to cover the bristles.
2 Add an Equal Portion of Hot Water to the Brush Cleaner
You can use hot water from the tap. In fact, I don’t recommend using boiling water because the extreme heat may damage the bristles. Warm water will work okay too. Pour the water into the glass container and stir it gently with the brush.
3 Soak the Brush in the Cleaner Overnight

I would give the brush at least 12 hours to soak in the cleaner. This will give it enough time to soften the acrylic paint so you can remove it. In this example, I let it soak for about 14 hours. I like to set this up in the evening. This will allow me to clean the brush before leaving for work in the morning.
There’s no need to put a lid on the container because there’s no odor at all. This is probably one of the best features of this cleaner. It doesn’t even smell like soap.
The binder clip is to prevent the brush from resting on the bristles. Allowing a brush to rest on its bristles can put a permanent bend in them. My post about how to take care of paint brushes has a photo of a paint brush with bent bristles.
I clamp the binder clip onto the paint brush handle and adjust it so that the tip of the brush is about a half inch from the bottom of the container.
You can also use a clothespin, which works better if you’re using a wide mouth container.
4 Remove the Brush From the Cleaner

Remove the clip from the handle of the brush and remove it from the container. I like to let the excess cleaner drain back into the container so that I don’t waste it. It’s also less messy because it will drip into the container instead of onto your work surface.
5 Use a Rag to Remove the Soft Paint

Wipe off the soft acrylic paint with a rag. It will be softer, but the paint will still be stuck onto the bristles. It takes some scrubbing to remove it. The paint on the outside of the bristles will eventually peel off.
6 Use an Old Toothbrush to Remove the Paint

Here I’m using an old toothbrush to scrub out bits of paint from between the bristles. This toothbrush has longer bristles at the end which works well for removing the paint.
Alternate between wiping paint off with the rag, and scrubbing with the toothbrush as necessary.
7 Use Your Hands to Separate the Bristles
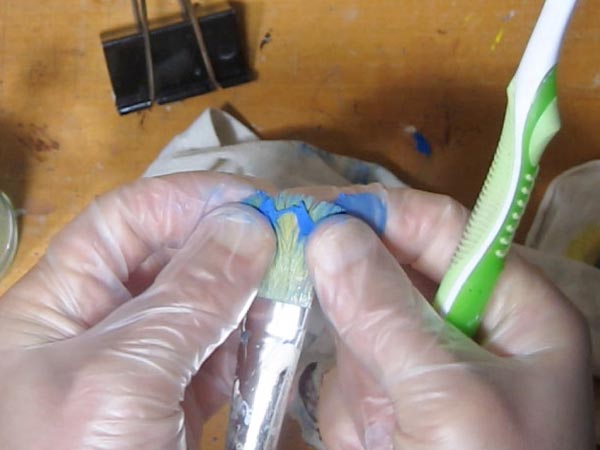
The thicker pieces of paint sometimes peel away if you pick at them with your hands. Here I’m pulling the bristles apart and stretching the paint. This weakens the paint and makes it easier to remove.
8 Use the Toothbrush Again

Eventually, most of the large globs of paint will come off and only smaller bits of acrylic remain. I like to use the toothbrush one last time to get the last bits of paint off of the bristles.
9 Wash the Brush With Soap and Warm Water
 Here I’m scrubbing the bristles into the bar of soap and warm water. The soap will remove some of the staining on the bristles. I have a separate bar of soap by my sink for cleaning my paint brushes.

Use your fingers to scrub the bristles and work the soap into them.

You can also use a rag to remove some of the dry paint off from the metal ferrule and the handle of the brush. This brush has smooth plastic handle so the paint wipes off fairly easy.
When you’re done, shape the bristles with your fingers to form an edge or a point and allow it to dry.
10 Repeat if Necessary
Most of the paint should be gone now. Repeat the process if there are still some chunks of paint stuck to the bristles.
I should note that certain colors will stain the bristles and won’t come out. As long as there aren’t any dry chunks of paint clinging to the bristles, it should be okay to use. The staining doesn’t affect the performance of the brush.
The organic pigments are usually the colors that stain the most. Phthalo Blue and Quinacridone Magenta are two examples of colors that have a tendency to stain.
Some of the staining may fade as you continue to use the brush.
The Problem With Using Solvents to Clean Your Brushes
Some artists resort using potent solvents to remove dry acrylic paint from their brushes. But if you’ve read any of my other articles, you will know that I prefer to avoid using toxic solvents. They’re smelly and breathing the fumes isn’t very healthy.
I’ve seen artists use lacquer thinner or alcohol to clean dry acrylic paint from their brushes. Many household cleaning products contain strong solvents. For example, nail polish remover is mostly made from acetone, and many stain removers contain xylene, toulene, and other toxic chemicals.
Hand sanitizer gel is something that artists recommend for cleaning dry acrylic paint from brushes. However, most hand sanitizers contain some form of alcohol. They may work, but I don’t recommend it. Try using the EZ Air brush cleaner instead.
The problem with using these solvents, aside from the safety concerns, is they can damage synthetic brushes. Many brushes that are made for acrylics are synthetic. The bristles may be made from nylon or other man made materials. Some solvents can dissolve certain types of synthetic materials. Another issue is that the solvents may weaken the adhesive that holds the bristles in the ferrule.
Don’t Boil Your Brushes
I also don’t recommend using boiling water along with vinegar or other substances to clean your brushes. The combination of boiling water and vinegar is fairly aggressive. It may work to clean your brushes, but it can damage them too.
Acetic acid is corrosive. Household vinegar is generally 95% water and 5% acetic acid. The reason why we can consume vinegar because it’s a weak dilution. Vinegar becomes corrosive to the skin when the acetic acid reaches concentrations of 10% or above (Source:Wikipedia).
The combination of heat and vinegar seems like it would be harsh on paint brushes, especially if they contain natural hair. The brush cleaner that I recommend was designed to be used with natural and synthetic brushes. It has been tried by numerous artists and it works.
If you’re looking to save money, you can make your own brush cleaner as described below.
Everyday Brush Cleaner
You can use the EZ Air Acrylic Brush Cleaner to clean your brushes after you finish painting. Follow the directions on the label. They recommend mixing 1 ounce of cleaner to 8 ounces of water.
I don’t use it every day. Instead, I use leftover hand soap from my bathroom to clean my brushes at the end of the day. When the soap gets too small to use in the shower, I use it in my studio for cleaning brushes. I’ll use the brush cleaner periodically to give my brushes a more thorough cleaning.
How to Make Your Own Brush Cleaner
I’m always looking for ways to save money. In fact, I created a list of 17 ways to save money on art supplies.
It turns out that the sodium carbonate is the main ingredient in the EZ Air Acrylic Brush Cleaner. Sodium carbonate is washing soda. It’s an ingredient that’s commonly found in laundry detergent.
I’ve experimented with using Arm & Hammer powder laundry detergent (link to Amazon) for cleaning my brushes.
To make your own brush cleaner, mix approximately 20% laundry detergent with 80% warm water and stir it until it dissolves. Then follow the instructions that I list above for the brush cleaner. I’ve used it to successfully remove dry acrylic paint from my brushes, but the brush cleaner is easier to use and more convenient.
On occasion, I also use a more diluted solution of water and laundry detergent to clean my brushes more thoroughly. I like having a box of this in my studio because it’s a backup for when I run out of my regular laundry detergent and for when I run out of brush cleaner.
Slow Drying Acrylics Are Easier on Your Brushes
If you’re always forgetting to wash out your brushes, you may want to switch to slow drying acrylics. I’ve been using Golden OPEN acrylics and I find that they’re much easier to clean from my brushes. This is because they stay wet for a much longer period of time than regular acrylics.
When I use more than one brush when I’m working on a painting, I don’t worry about them drying out if I get too distracted. Thick gobs of paint will stay wet for hours. Read my post about how long it takes for acrylics to dry to find out how to alter the drying times of acrylic paints.
A brush that has been sitting out all night may still be wet the following morning, depending upon the conditions. Even if the paint seems like it’s dry, it may not have had a chance to fully cure. This means that you will probably be able to scrub it out with regular soap. If not, then try the brush cleaner.
If you’ve ever got acrylic paint on your clothes, you may want to read does acrylic come out in the wash? I purposely ruin a couple of T-shirts and run them through my washing machine. I also try to remove dry acrylic from a pair of my jeans.


Hello,
I’m very new to acrylic art. I was a nurse and midwife for more than 30 years and the was ill for 3 years. After that we, as a family decided that I couldn’t go back to the stress, stress and more stress and 12 hour shifts. I’ve always been creative in my hobbies, REAL decoupage, calligraphy, knitting and crochet.
So, while I was of I decided to look for something that could be more profitable. Let me explain why….our eldest son has had cancer twice and a transplant and once we got him home to care for and build up his strength again Tom and I decided we wanted to do something tangible for the unit that cared for our much loved son.
Whist browsing the Internet I don’t know how, but acrylic painting came up so I bought some paints and started watching YouTube constantly. His dad has cycled thousands of miles to raise money and the only stipulation we ask from the unit is that the cash goes to the siblings of the children who are ill. Their lives were turned upside down too…….not all families are as fortunate as we were and I remind my self of that on a daily basis……I put 4 kisses at the end of all my posts…. I’m not being overly familiar, just thankful…..Perhaps in the future you could help me re. places that I can sell my pictures….I really would appreciate it.
Thanks,
Jane ….xxxx
Oh and yes, the real reason for this email, I don’t seem to b able to access the site as to clean ur acrylic paint brushes if they’ve gone hard !……
Thanks Jane for sharing your story! Art can be very therapeutic. As for your question about places to sell artwork you can try etsy, ebay, and I’ve been using Daily Paintworks. Selling artwork requires some effort, you have to spend about half of your time on marketing. Good luck!